


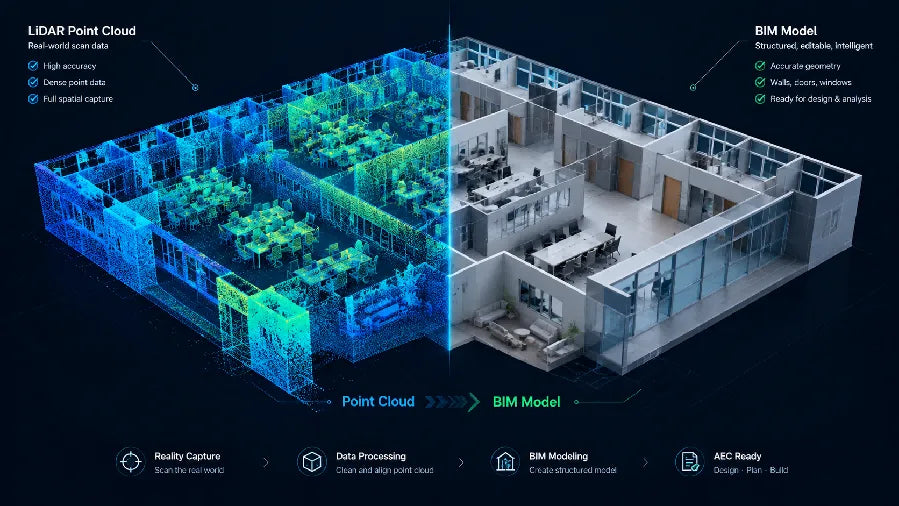
Point cloud to BIM is the professional workflow for converting site scans into a structured BIM model. This process supports existing-condition documentation, renovation planning, and as-built delivery. It is important to note that this is not a promise of perfect, automated reconstruction. A successful project relies on a model built from strategic scan coverage, disciplined data cleanup, and a clearly defined modeling scope. This workflow helps teams document what is visible and verified while ensuring that uncertain areas remain clearly bounded.
What is Scan to BIM?
Scan to BIM turns site scans into a BIM model that teams can use for design, coordination, and documentation. A 3D LiDAR scan creates a point cloud, a measured record of the real space. After cleanup, a modeler uses that data to build editable elements such as walls, floors, doors, and visible MEP systems.
Put simply, the point cloud shows what was captured on-site, while the BIM model makes that information usable. For example, a renovation team can model an existing wall at its actual location instead of relying on an outdated plan. Before scanning, agree on the required accuracy and level of detail so the final model fits the project scope.
Key Benefits of Scan to BIM
Start With Verified Site Conditions
Existing drawings do not always reflect later changes. A point cloud gives architects and engineers a current reference for planning a renovation, fit-out, or coordination task.
Capture More in One Visit
A 3D LiDAR capture records far more spatial context than isolated measurements and photos. For teams that need a point cloud alongside visual documentation, devices such as Galois P4 or Galois M2 can support multiple project deliverables from one capture, depending on the required scope.
A Miami architecture firm uses Galois point clouds and virtual tours to document remodeling sites and share a common reference with engineers. Instead of relying on scattered photos, the team can return to the captured record when it needs to check a detail.
Reduce Avoidable Rework
Modeling from verified conditions can reveal conflicts before work begins. If a proposed duct route clashes with an existing beam, the team can resolve it in the model rather than discovering it after crews arrive on-site.

When Teams Need This Workflow
The point cloud to BIM workflow is most effective when existing site conditions are complex and "design intent" drawings are insufficient. Common scenarios include:
Renovation and Retrofit: Essential when walls, slabs, or MEP routes are irregular or hidden behind finishes.
As-Built Documentation: Required after construction phases when field changes have deviated from the original design.
Clash-Check Preparation: Necessary when coordination depends on a reliable model of the current environment.
Fast-Turn Verification: Used before major design changes to capture current conditions without the errors of manual measurement.
Selective Modeling: When a team only needs to model a specific zone or system rather than the entire facility.
A common rule of thumb: if a project only requires a light field check, a full scan-to-BIM workflow may exceed the necessary budget. However, if the site is complex or access is limited, the workflow pays off by reducing assumptions and rework. For teams looking to get more value from a single capture, explore Realsee solutions for architects and designers to see how spatial data can support project documentation and reusable deliverables.

Step 1: Capture the Site With a Point Cloud Scanner
High-quality modeling begins with a disciplined field plan. If the scan plan is insufficient, the office team is forced to make speculative decisions later.
Plan the capture around the final deliverable. Map out rooms, elevations, and transitions before the first scan. Mechanical rooms, tight corridors, and areas with reflective finishes deserve extra attention, as these are frequent sources of "data holes."
The choice of hardware should match the required Level of Detail (LOD). A scanner optimized for broad space documentation might not provide the density needed for intricate MEP coordination. The goal is not to generate the largest possible dataset, but to collect enough usable evidence for the modeler to work with confidence.
It is also best practice to record what the scanner cannot see. Note blocked areas or temporary obstructions. These field notes tell the BIM team where the model should remain cautious. For teams evaluating hardware, professional-grade LiDAR solutions like the Realsee Galois series (such as the Galois P4 or M2) can serve as a reliable foundation, but the scan strategy must always be tailored to the specific project site.
Step 2: Prepare and Clean the Point Cloud Files
File preparation is the stage where projects either stay organized or become unmanageable. The objective is to make data usable without stripping away the evidence the modeler needs.
The use of an open point cloud exchange format, such as those discussed in ASTM E2807, is critical for interoperability. Before handing off files, confirm that the BIM or CAD environment can natively ingest the chosen format.
Follow a "non-destructive" cleanup rule: remove obvious noise and artifacts (like moving people or cars), but preserve the raw geometry of the building. Always store processed files separately from the original captures. Before modeling, verify three critical factors:
Coordinate Consistency: Ensure the scan aligns with the project's coordinate system.
Units: Confirm the scale is correct (e.g., meters vs. feet).
Version Control: Clearly label files by area and date.

Step 3: Import and Model in BIM or CAD
Alignment decisions dictate the usability of the model. The most reliable approach is to organize the work around established reference geometry rather than "eyeballing" the point cloud into place.
| Task | What It Controls | Common Risk | Practical Result |
|---|---|---|---|
| Set Import Reference | Spatial positioning | Offset or rotation errors | Model starts in a known, repeatable position |
| Use Levels and Grids | Structural organization | Sloppy orientation | The file remains manageable for the whole team |
| Model to Scope | Level of Detail (LOD) | Over-modeling low-value items | Effort stays aligned with the project budget |
| Geometry Checks | Accuracy | Late-stage rework | Errors are caught before they propagate |
The import step is more than a technicality; it determines if the model is easy to audit and update. For teams that require editable as-built output for CAD workflows, the same logic applies: only model the detail that supports the specific project deliverable.

Step 4: Verify the Model and Deliver Final Files
Verification is where the model earns its "as-built" status. A scan-to-BIM project should be checked against the point cloud incrementally, not just at the final deadline.
Use the agreed-upon LOA as the benchmark for review. This prevents vague handoff language like "close enough." A standard final check includes:
Visual Comparison: Overlay the model and point cloud to check for misses or simplifications.
Conflict Resolution: Address uncertain geometry rather than guessing.
Scope Confirmation: Ensure all requested elements (BIM files, 2D drawings, etc.) are included.
Stakeholder Review: Walk through the model with the team members who will use it for design or construction.
Archiving: Save the source data and processing notes for future traceability.
Start Your Next Scan-To-BIM Project
A successful Scan-to-BIM project starts with a clear scope. Define the deliverable, required accuracy, and review process before arriving on-site, so the team captures the data it actually needs.
Realsee helps architecture and design teams turn a single site capture into usable spatial outputs. With 3D LiDAR cameras such as Galois P4 and Galois M2, teams can generate point clouds, CAD outputs, floor plans, and 3D tours to support renovation planning, existing-condition documentation, and design coordination. Explore Realsee solutions for architects and designers to find the right workflow for your next project.
Frequently Asked Questions About Point Cloud to BIM Workflow
How accurate is a point cloud to BIM model?
Accuracy depends on the hardware used, the density of the scan, and the modeling tolerance set at the start of the project. It should be treated as project-specific. The best way to ensure accuracy is to define a Level of Accuracy (LOA) that matches the project's needs.
What file format should point cloud data use for BIM?
Common formats include.E57,.RCP, and.LAS. Open exchange formats are generally preferred for interoperability, but you should always confirm compatibility with your specific BIM software (like Revit or ArchiCAD) before processing the data.
Can point cloud scans replace a field visit?
While scans significantly reduce the need for repeat site visits, they do not always replace them entirely. Scans capture what is visible; they cannot see through walls or into unaccessed areas. Critical structural or mechanical details may still require manual verification.
What Level of Detail (LOD) should the BIM model include?
The LOD should match the project's end-use. A model for facility management may only need LOD 200 (general elements), while a model for detailed MEP coordination may require LOD 300 or 350. Over-modeling leads to higher costs without necessarily adding value.
Why is point cloud cleanup necessary?
Cleanup removes "noise"—such as reflections, dust, or moving objects—that can confuse the modeling software or the modeler. It makes the file smaller and easier to navigate, ensuring the modeling process is as efficient as possible.